flutter: riverpod setState() or markNeedsBuild() called during build.
エラーの内容はもうちょっと長いバージョンだとこうなります。
setState() or markNeedsBuild() called during build.
This UncontrolledProviderScope widget cannot be marked as needing to build because the framework is already in the process of building widgets.  A widget can be marked as needing to be built during the build phase only if one of its ancestors is currently building. This exception is allowed because the framework builds parent widgets before children, which means a dirty descendant will always be built. Otherwise, the framework might not visit this widget during this build phase.
エラーを引き起こしたコードはこんな感じです。 debugコンソールに永遠とログが出力されるので実行しないでください。
void main() {
  runApp(ProviderScope(
      child: MaterialApp(
    home: Scaffold(
      body: MyBody(),
    ),
  )));
}

class CheckController extends StateNotifier<bool> {
  CheckController(state) : super(state);

  toggle() {
    state = !state;
  }
}

final checkProvider =
    StateNotifierProvider<CheckController, bool>((_) => CheckController(true));

class MyBody extends HookConsumerWidget {
  @override
  Widget build(BuildContext context, ref) {
    final controller = ref.watch(checkProvider.notifier);
    final check = ref.watch(checkProvider);
    return Center(
      child: ElevatedButton(
        child: Text('$check'),
        // 本当は ()=> _onPressed(controller)
        onPressed: _onPressed(controller),
      ),
    );
  }

  _onPressed(CheckController controller) {
    controller.toggle();
  }
}
onPressedに引数ありでfunctionを渡すときにやりがちです。
引数で、controller(StateNotifier)を渡すのもどうかと思いますが。
MyBodyのbuildの最中に_onPressed(controller)が実行されてしまい、 中の処理でstateが変わるので、hookが検知して、またbuildが走り、無限ループです。
flutter: 角丸ボーダー付きのボックスの右上にチェックマークを入れる
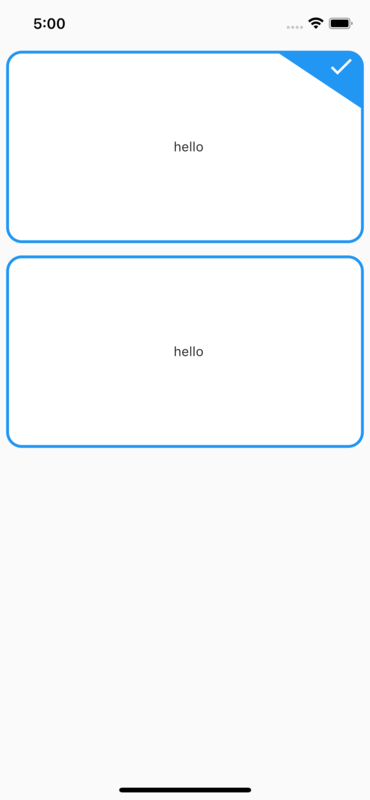
Container + BoxDecorationだと実現できなかったのでpaintしました。
本体
import 'package:flutter/material.dart';

class CheckableBox extends CustomPainter {
  CheckableBox({required this.isChecked});
  final bool isChecked;

  @override
  void paint(Canvas canvas, Size size) {
    double w = size.width;
    double h = size.height;
    double r = 15; //<-- corner radius

    // ボーダー部分
    Paint borderPaint = Paint()
      ..color = Colors.blue
      ..style = PaintingStyle.stroke
      ..strokeWidth = 3;

    // 内側は白く塗る
    Paint innerPaint = Paint()
      ..color = Colors.white
      ..style = PaintingStyle.fill;

    // 右上の三角でチェックが入ってる部分を塗る
    Paint topRightArcPaint = Paint()
      ..color = Colors.blue
      ..style = PaintingStyle.fill
      ..strokeWidth = 5;

    RRect fullRect = RRect.fromRectAndRadius(
      Rect.fromCenter(center: Offset(w / 2, h / 2), width: w, height: h),
      Radius.circular(r),
    );

    Path topRightArc = Path()
      // 右上が開始なので、まず左に移動
      ..moveTo(w - 6 * r, 0)
      // arc始まりの部分まで線を引く
      ..relativeLineTo(5 * r, 0)
      // 右上のarcの部分を描くというかなぞる
      ..arcToPoint(Offset(w, r), radius: Radius.circular(r))
      // arcの終わりから下に線を引く
      ..relativeLineTo(0, 3 * r)
      // 最後は斜辺を描く
      ..relativeLineTo(-6 * r, -4 * r);

    canvas.drawRRect(fullRect, innerPaint);
    canvas.drawRRect(fullRect, borderPaint);

    if (isChecked) {
      canvas.drawPath(topRightArc, topRightArcPaint);

      final icon = Icons.check;
      TextPainter textPainter = TextPainter(textDirection: TextDirection.rtl);
      textPainter.text = TextSpan(
          text: String.fromCharCode(icon.codePoint),
          style: TextStyle(
              fontSize: 30.0,
              fontFamily: icon.fontFamily,
              color: Colors.white));
      textPainter.layout();
      textPainter.paint(canvas, Offset(w - 2.5 * r, 0));
    }
  }

  @override
  bool shouldRepaint(CustomPainter oldDelegate) {
    return true;
  }
}
実行する側のコード
import 'package:flutter/material.dart';

import 'checkable_box.dart';

void main() {
  runApp(const MyApp());
}

class MyApp extends StatelessWidget {
  const MyApp({Key? key}) : super(key: key);

  @override
  Widget build(BuildContext context) {
    return MaterialApp(
      theme: ThemeData.light(),
      debugShowCheckedModeBanner: false,
      home: const Scaffold(body: SafeArea(child: MyScreen())),
    );
  }
}

class MyScreen extends StatelessWidget {
  const MyScreen({Key? key}) : super(key: key);

  static final checks = [true, false];

  @override
  Widget build(BuildContext context) {
    return Center(
        child: ListView.builder(
            itemCount: 2,
            itemBuilder: (context, index) {
              return Padding(
                padding: const EdgeInsets.all(8.0),
                child: MyWidget(
                  isChecked: checks.elementAt(index),
                ),
              );
            }));
  }
}

class MyWidget extends StatelessWidget {
  const MyWidget({Key? key, required this.isChecked}) : super(key: key);

  final bool isChecked;

  @override
  Widget build(BuildContext context) {
    return SizedBox(
      width: MediaQuery.of(context).size.width - 32,
      height: 200,
      child: LayoutBuilder(builder: (context, constraints) {
        return CustomPaint(
            painter: CheckableBox(isChecked: isChecked),
            child: const Padding(
              padding: EdgeInsets.only(left: 8.0),
              child: Center(child: Text('hello')),
            ));
      }),
    );
  }
}
https://github.com/na8esin/flutter2_practice/tree/main/lib/src/custom_paint
Dart: The Iterable.firstWhere method no longer accepts orElse: () => null.
https://dart.dev/null-safety/faq#the-iterablefirstwhere-method-no-longer-accepts-orelse---null
と、FAQにも書いてありますが、
こっちはもちろんエラーになる
void main(List<String> args) {
  final list = [1, 2, 3];
  // The return type 'Null' isn't a 'int', as required by the closure's context.
  final x = list.firstWhere((element) => element > 3, orElse: () => null);

  if (x == null) {
    // do stuff...
  }
}
こっちは正常に実行できる
void main(List<String> args) {
  final List<int?> list = [1, 2, 3];
  // 本当にlistにnullが混ざるなら、element!だとだめですが。。。
  final x = list.firstWhere((element) => element! > 3, orElse: () => null);

  assert(x == null);
}
後者のパターンも疑問が残る使い方ではあるので、 大人しくpackage:collectionを使うのがいいとは思います。
もしくは
void main(List<String> args) {
  final List<int> list = [1, 2, 3];
  final found = list.where((element) => element > 3);
  final x = found.isEmpty ? null : found.first;

  assert(x == null);
}
こんな感じかなと思います。
Flutter fabの使い方を説明するために上に吹き出しをつける

言葉で説明しなくてもいいのがマテリアルデザインですが、 こういう依頼が来ることもたまにありますよね。
Bubbleもパッケージがあるのですが、矢印の部分(三角のところ)が自由に移動できなかったので、 自作しました。
import 'package:flutter/material.dart';

class Bubble extends StatelessWidget {
  Bubble({Key? key, required this.text, required this.textStyle})
      : super(key: key);

  final String text;
  final TextStyle textStyle;

  @override
  Widget build(BuildContext context) {
    return Container(
      height: 100,
      padding: const EdgeInsets.only(left: 32, top: 16, right: 32, bottom: 8),
      // ここにconstつけるとhot reloadで変わらない
      decoration: ShapeDecoration(
        color: Colors.blue,
        shadows: [
          BoxShadow(
            color: Color(0x80000000),
            offset: Offset(0, 2),
            blurRadius: 2,
          )
        ],
        shape: BubbleBorder(),
      ),
      child: Column(
        mainAxisAlignment: MainAxisAlignment.center,
        children: <Widget>[
          Text(
            text,
            style: textStyle,
          ),
        ],
      ),
    );
  }
}

class BubbleBorder extends ShapeBorder {
  final bool usePadding;

  const BubbleBorder({this.usePadding = true});

  @override
  EdgeInsetsGeometry get dimensions => const EdgeInsets.all(0);

  @override
  Path getInnerPath(Rect rect, {TextDirection? textDirection}) => Path();

  @override
  Path getOuterPath(Rect rect, {TextDirection? textDirection}) {
    return Path()
      // xは少なくなると左、多くなると右
      // yは少なくなると上に移動する
      ..moveTo(rect.bottomCenter.dx + 28, rect.bottomCenter.dy)
      ..relativeLineTo(45, 16)
      ..relativeLineTo(6, -16)
      ..addRRect(RRect.fromRectAndRadius(rect, const Radius.circular(8)))
      ..close();
  }

  @override
  void paint(Canvas canvas, Rect rect, {TextDirection? textDirection}) {}

  @override
  ShapeBorder scale(double t) => this;
}
上のコードを呼び出すmain
import 'package:flutter/material.dart';

import 'bubble.dart';

void main() {
  runApp(MaterialApp(
    home: MySca(),
  ));
}

class MySca extends StatelessWidget {
  @override
  Widget build(BuildContext context) {
    return Scaffold(
        appBar: AppBar(
          title: const Text('fabの上に吹き出し'),
        ),
        floatingActionButton: Column(
          crossAxisAlignment: CrossAxisAlignment.end,
          mainAxisSize: MainAxisSize.min,
          children: [
            Padding(
              padding: const EdgeInsets.only(right: 0),
              child: Bubble(
                  text: 'こちらを押すと新規登録です',
                  textStyle: const TextStyle(
                      color: Colors.white,
                      fontWeight: FontWeight.bold,
                      fontSize: 18)),
            ),
            Padding(
                padding: const EdgeInsets.only(top: 16),
                child: FloatingActionButton(
                  child: Icon(Icons.add),
                  onPressed: () {},
                )),
          ],
        ),
        body: SizedBox.shrink());
  }
}
https://github.com/na8esin/flutter2_practice/tree/main/lib/src/bubble
Flutter BoxPainterでpie_chartを描く(中心に文字が入れられる)

こんな感じのpie_chartを作りました。
chartの中心に文字が入れられる既存のパッケージが見つからなかったので、 flutter galleryのソースを見ながら作りました。
drawArcで大小二つのArcをかいて、内側のArcは白く塗りつぶしてます。
まずはチャートと中の文字を生成している部分
import 'dart:math' as math;

import 'package:flutter/material.dart';

// 参考ソース
// https://github.com/flutter/gallery/blob/master/lib/studies/rally/charts/pie_chart.dart

class MyChart extends StatelessWidget {
  const MyChart(
      {Key? key,
      required this.total,
      required this.rest,
      required this.outerRPerParentHeightHalf,
      this.percentageFontSize})
      : super(key: key);

  final int total;
  final int rest;
  final double outerRPerParentHeightHalf; // 外側の半径 / 親の高さの半分
  final double? percentageFontSize;

  int get percentage => (total == 0 ? 0 : (rest / total * 100).toInt());

  @override
  Widget build(BuildContext context) {
    return LayoutBuilder(builder: (context, constraints) {
      return ConstrainedBox(
        constraints: constraints,
        child: DecoratedBox(
          decoration: MyDecoration(
              percentage: percentage,
              outerRPerParentHeightHalf: outerRPerParentHeightHalf),
          child: Column(
            mainAxisAlignment: MainAxisAlignment.center,
            children: [
              Text(
                '$percentage%',
                style: TextStyle(
                    fontWeight: FontWeight.bold,
                    fontSize: percentageFontSize,
                    color: Colors.blue),
              ),
              Padding(
                padding: const EdgeInsets.only(top: 8.0),
                child: Text(
                  '$rest/$total',
                  style: TextStyle(
                      fontWeight: FontWeight.bold, color: Colors.blue),
                ),
              ),
            ],
          ),
        ),
      );
    });
  }
}

class MyDecoration extends Decoration {
  const MyDecoration(
      {required this.percentage, required this.outerRPerParentHeightHalf});

  final int percentage;
  final double outerRPerParentHeightHalf;

  @override
  BoxPainter createBoxPainter([VoidCallback? onChanged]) {
    return MyBoxPainter(
        amount: percentage,
        outerRPerParentHeightHalf: outerRPerParentHeightHalf);
  }
}

class MyBoxPainter extends BoxPainter {
  MyBoxPainter({required this.amount, required this.outerRPerParentHeightHalf});
  final double outerRPerParentHeightHalf;
  late double outerR;

  final int amount;

  double get innerR => outerR * 0.75;
  double get centerR => (outerR - innerR) / 2 + innerR;
  double get circleR => (outerR - innerR) / 2;

  // 100%=360度 としたときの角度にまずは直す
  double get endAngle => amount * 360 / 100;
  double get endRadian => -endAngle * math.pi / 180;

  // configuration.sizeは謎のpaddingを引いた分
  @override
  void paint(Canvas canvas, Offset offset, ImageConfiguration configuration) {
    outerR = configuration.size!.height / 2 * outerRPerParentHeightHalf;

    // まずはドーナッツのうす水色を作る
    drawRest(canvas, offset, configuration);
    // 有効なところは青く
    drawAnswer(canvas, offset, configuration);

    // 端を滑らかにするための円
    drawStartCircle(canvas, offset, configuration);
    drawEndCircle(canvas, offset, configuration);
  }

  drawRest(Canvas canvas, Offset offset, ImageConfiguration configuration) {
    final paint = Paint()..color = Colors.blue[50]!;
    canvas.drawArc(
        Rect.fromCircle(
            center: configuration.size!.center(offset), radius: outerR),
        0.0,
        360 * math.pi / 180,
        true,
        paint);

    final paint2 = Paint()..color = Colors.white;
    canvas.drawArc(
        Rect.fromCircle(
            center: configuration.size!.center(offset), radius: innerR),
        0.0,
        360 * math.pi / 180,
        true,
        paint2);
  }

  drawAnswer(Canvas canvas, Offset offset, ImageConfiguration configuration) {
    final paint = Paint()..color = Colors.blue;
    final startRad = -90 * math.pi / 180;

    canvas.drawArc(
        Rect.fromCircle(
            center: configuration.size!.center(offset), radius: outerR),
        startRad,
        endRadian,
        true,
        paint);

    final paint2 = Paint()..color = Colors.white;
    canvas.drawArc(
        Rect.fromCircle(
            center: configuration.size!.center(offset), radius: innerR),
        startRad,
        endRadian,
        true,
        paint2);
  }

  drawStartCircle(
      Canvas canvas, Offset offset, ImageConfiguration configuration) {
    final centerOffset = configuration.size!.center(offset);
    final centerOffsetDy = centerOffset.dy;
    final circleOffsetDy = centerOffsetDy - centerR;
    final paint = Paint()..color = Colors.blue;
    canvas.drawCircle(Offset(centerOffset.dx, circleOffsetDy), circleR, paint);
  }

  drawEndCircle(
      Canvas canvas, Offset offset, ImageConfiguration configuration) {
    // drawArcと座標系が違う
    final radian = (270 - endAngle) * math.pi / 180;

    final x = centerR * math.cos(radian);
    final y = centerR * math.sin(radian);

    final centerOffset = configuration.size!.center(offset);
    final paint = Paint()..color = Colors.blue;
    canvas.drawCircle(
        // xはプラスで右、yはマイナスで上
        Offset(centerOffset.dx + x, centerOffset.dy + y),
        circleR,
        paint);
  }
}
デバッグするためのコード
import 'package:flutter/material.dart';

import 'my_chart.dart';

void main() {
  runApp(MaterialApp(
    home: MySca(),
  ));
}

class MySca extends StatelessWidget {
  @override
  Widget build(BuildContext context) {
    return SafeArea(
      child: Scaffold(appBar: AppBar(), body: MyGridView()),
    );
  }
}

class MyGridView extends StatelessWidget {
  @override
  Widget build(BuildContext context) {
    return GridView.count(
      crossAxisCount: 2,
      children: [MyBox(), MyBox()],
    );
  }
}

class MyBox extends StatelessWidget {
  @override
  Widget build(BuildContext context) {
    return Container(
      decoration: BoxDecoration(
          color: Colors.white,
          border: Border.all(
            color: Colors.blueAccent,
            width: 2,
          ),
          borderRadius: BorderRadius.circular(15)),
      child: MyChart(total: 300, rest: 240, outerRPerParentHeightHalf: 0.5),
    );
  }
}
https://github.com/na8esin/flutter2_practice/tree/main/lib/src/chart
flutter firebase auth Googleプロバイダを使う
Play Consoleアカウントをお金を払って登録していることが条件
アプリごとに SHA1 フィンガープリントを追加する
https://developers.google.com/android/guides/client-auth?authuser=0
そのためには何でもいいので適当にアプリを作ってflutter build appbundle
それを内部テストでもいいのでリリースを作ってアップロード
サンプル作って動かしたらエラーが発生
サンプル
https://firebase.flutter.dev/docs/auth/social#google
エラー内容
com.google.android.gms.common.api.ApiException: 10
Play Consoleの アップロード鍵の証明書のところにあるSHA-1 証明書のフィンガープリントをFirebaseのコンソールに登録しないとダメみたいなので、登録し直し。
気を取り直して、サンプルを動かすとデバッグでコンソールにuser情報が出力されることを確認
import 'package:firebase_core/firebase_core.dart';
import 'package:flutter/material.dart';
import 'package:google_sign_in/google_sign_in.dart';
import 'package:firebase_auth/firebase_auth.dart';

Future<UserCredential?> signInWithGoogle() async {
  // Trigger the authentication flow
  final GoogleSignInAccount? googleUser = await GoogleSignIn().signIn();
  if (googleUser == null) {
    return null;
  }

  // Obtain the auth details from the request
  final GoogleSignInAuthentication googleAuth = await googleUser.authentication;

  // Create a new credential
  final credential = GoogleAuthProvider.credential(
    accessToken: googleAuth.accessToken,
    idToken: googleAuth.idToken,
  );

  // Once signed in, return the UserCredential
  return await FirebaseAuth.instance.signInWithCredential(credential);
}

Future<void> main() async {
  WidgetsFlutterBinding.ensureInitialized();
  await Firebase.initializeApp();
  runApp(MaterialApp(
    home: Scaffold(
      body: MyBody(),
    ),
  ));
}

class MyBody extends StatelessWidget {
  @override
  Widget build(BuildContext context) {
    return Center(
      child: ElevatedButton(
        child: Text('SIGN IN'),
        onPressed: () async {
          final user = await signInWithGoogle();
          print(user);
        },
      ),
    );
  }
}
この段階でAuthenticationにレコードができる
sign in, outをいい感じにする
単純にやると下記のようなコードになると思います。
// signInWithGoogleはさっきと変わりなし
Future<void> main() async {
  WidgetsFlutterBinding.ensureInitialized();
  await Firebase.initializeApp();
  runApp(ProviderScope(child: MyApp()));
}

final authStateChangesProvider = StreamProvider((ref) {
  return FirebaseAuth.instance.authStateChanges();
});

class MyApp extends HookConsumerWidget {
  @override
  Widget build(BuildContext context, ref) {
    return MaterialApp(home: AuthWidget());
  }
}

class AuthWidget extends HookConsumerWidget {
  @override
  Widget build(BuildContext context, WidgetRef ref) {
    return ref.watch(authStateChangesProvider).when(
        data: (user) {
          if (user == null) return SignInScreen();
          return Scaffold(
            floatingActionButton: FloatingActionButton(
              onPressed: () async {
                await FirebaseAuth.instance.signOut();
              },
              child: Text('SIGN OUT'),
            ),
            body: WellcomeScreen(),
          );
        },
        error: (e, s, d) => Center(child: Text('$e')),
        loading: (d) => CircularProgressIndicator());
  }
}

class SignInScreen extends StatelessWidget {
  @override
  Widget build(BuildContext context) {
    return Center(
      child: ElevatedButton(
        child: Text('SIGN IN'),
        onPressed: () async {
          // googleアカウントを選択するポップアップが起動して選択するとログインできる
          await signInWithGoogle();
        },
      ),
    );
  }
}

class WellcomeScreen extends StatelessWidget {
  const WellcomeScreen({Key? key}) : super(key: key);

  @override
  Widget build(BuildContext context) {
    return Center(
      child: Row(
        mainAxisAlignment: MainAxisAlignment.center,
        children: [
          Text('Wellcome'),
          ElevatedButton(
              onPressed: () async {
                // この方法だと遷移先でsign outしてもsignInページには移動しない
                Navigator.push(
                  context,
                  MaterialPageRoute(builder: (context) => AnotherScreen()),
                );
              },
              child: Text('to another screen'))
        ],
      ),
    );
  }
}

class AnotherScreen extends StatelessWidget {
  @override
  Widget build(BuildContext context) {
    return Column(
      children: [
        Center(child: Text('AnotherScreen')),
        ElevatedButton(
            onPressed: () async {
              // signOutが実行されてもこのページは表示されたまま
              await FirebaseAuth.instance.signOut();

              // 例えば苦し紛れにこの辺でNavigator.pushなどすると、
              // SignInScreenからandroidのbackボタンで
              // このAnotherScreenに戻ってこれる。
              // その時、firestoreなどに接続するようになってると
              // 権限の問題でエラーが発生したりする。
            },
            child: Text('SIGN OUT'))
      ],
    );
  }
}
ソースのコメントに書いてありますが、うまくsign outしません
単純にNavigatorを使うと上手くいきます。
class AuthWidget extends HookConsumerWidget {
  @override
  Widget build(BuildContext context, WidgetRef ref) {
    return ref.watch(authStateChangesProvider).when(
        data: (user) {
          if (user == null) return SignInScreen();
          return Scaffold(
            floatingActionButton: FloatingActionButton(
              onPressed: () async {
                await FirebaseAuth.instance.signOut();
              },
              child: Text('SIGN OUT'),
            ),
            // ここにNavigatorを追加するだけで、AnotherScreenまで行った時に
            // fabでsign outすると、sign inページに遷移する
            body: Navigator(
              pages: const [
                MaterialPage(
                  key: ValueKey('WellcomeScreen'),
                  child: WellcomeScreen(),
                )
              ],
              onPopPage: (route, result) => route.didPop(result),
            ),
          );
        },
        error: (e, s, d) => Center(child: Text('$e')),
        loading: (d) => CircularProgressIndicator());
  }
}
https://github.com/na8esin/flutter2_open_project/tree/main/lib/src/auth
Flutter BLoCを軽く調べる
自分は最初からriverpodで始めたので必要ないかと思いましたが、たまに見かけるので。
BLoC
stands for Business Logic Components.
cubitが統合されてる
https://github.com/felangel/cubit
どんなコード?
https://bloclibrary.dev/#/coreconcepts?id=creating-a-cubit
class CounterCubit extends Cubit<int> {
  CounterCubit(int initialState) : super(initialState);
}
StateNotifierに似てる
https://pub.dev/packages/state_notifier
stateを変更する場合はemitを使う
class CounterCubit extends Cubit<int> {
  CounterCubit() : super(0);

  void increment() => emit(state + 1);
}
stateを変更するStateNotifierとはちょっと違う
Just like with Cubit, a Bloc is a special type of Stream,
https://bloclibrary.dev/#/coreconcepts?id=stream-usage-1
enum CounterEvent { increment, decrement }

class CounterBloc extends Bloc<CounterEvent, int> {
  CounterBloc() : super(0);

  @override
  Stream<int> mapEventToState(CounterEvent event) async* {
    switch (event) {
      case CounterEvent.decrement:
        yield state - 1;
        break;
      case CounterEvent.increment:
        yield state + 1;
        break;
    }
  }
}
caseでメソッドを判定したり、yieldを使ったり結構癖がある気がするが、 全てがstreamで表現されるのは統一性があるのかもしれない。
それと中でproviderを使ってる
https://github.com/felangel/bloc/blob/master/packages/flutter_bloc/pubspec.yaml#L16
providerがメンテされなくなったらどうなるのだろうか?